- 1 Hour of Coding a Car Racing Game
#Challenge 3 : Code a JavaScript Game
Code a Simple Car Racing Game using JavaScript Programming. The game should be simple, responsive and fun to play with following features.
- A car that the player can move left and right using the arrow keys
- Other cars coming down the road, and the player must avoid them.
- A score that increases as the player avoids cars.
- Collision detection to end the game if the player hits another car.
- Fullscreen and responsive design using canvas resizing.
Let us accept this simple challenge and code a Car Racing Game using JavaScript from Scratch. This is a step-by-step guide to building this game with features like moving the car left and right, road effects, collision detection with other cars, a score system, and a full-screen responsive design.
Step 1: Setup your Project Structure
Create the project folder for your game (e.g., car-racing-game). This folder will contain all the files required for the game.
Inside the folder, create the following files:
index.html: This will hold the structure of the web page.styles.css: This will hold the styles and design of the game.game.js: This will hold the JavaScript for game logic.
Step 2: Setup the HTML Web Page
Launch a text editor or open your favourite IDE. First, we’ll start with creating a webpage where the game will be displayed. Create a file (index.html) with the basic HTML structure.
					<!DOCTYPE html>
<html lang="en">
<head>
  <meta charset="UTF-8">
  <meta name="viewport" content="width=device-width, initial-scale=1.0">
  <title>Car Racing Game</title>
  <link rel="stylesheet" href="styles.css">
</head>
<body>
  <div class="game-container">
    <canvas id="gameCanvas"></canvas>
    <div id="score">Score: 0</div>
  </div>
  <script src="game.js"></script>
</body>
</html>
The HTML body contains a game-container (div) which hosts a <canvas> element that will be used to draw our game. There is a div area next to it to display the score.
As you know that a HTML page is just a skeleton and we need to include some styles (CSS) to it to enhance the visuals. Lets add a <link> tag to include a CSS file that will contain all the styling required for the game.
Link the JavaScript code (game.js) that we have already created using the <script> tag.
Step 3: Adding Styles
Lets add some CSS styles to the web page we created above. Add these lines in styles.css file.
					* {
  margin: 0;
  padding: 0;
  box-sizing: border-box;
}

body, html {
  height: 100%;
  display: flex;
  justify-content: center;
  align-items: center;
  background-color: #333;
  color: white;
}

.game-container {
  position: relative;
}

#gameCanvas {
  background-color: #555;
  display: block;
}

#score {
  position: absolute;
  top: 10px;
  left: 20px;
  font-size: 20px;
  font-family: Arial, sans-serif;
}
This CSS code resets the default margin and padding for all elements with *, and ensures the box-sizing is set to border-box for consistent box model behavior. For the body and html, it sets their height to 100% of the viewport, uses flexbox to center the content both vertically and horizontally, and applies a dark background with white text. The .game-container class positions its elements relatively, while #gameCanvas has a dark background and is displayed as a block. Finally, the #score element is positioned absolutely at the top-left with specific font styling.
Step 4: Setup the Game Canvas
Now the things will start getting interesting as we start writing javascript code. Lets open the game.js file. Here we will be setting up a basic game using the <canvas> element.
Access the canvas element (gameCanvas) using getElementById() and retrieve its 2D drawing context (getContext("2d")).
Then sets the canvas dimensions to fill the entire screen (window.innerWidth and window.innerHeight).
					const canvas = document.getElementById("gameCanvas");
const ctx = canvas.getContext("2d");

// Set the canvas size to fill the screen
canvas.width = window.innerWidth;
canvas.height = window.innerHeight;
Step 5: Define the Game Properties
Car Properties: Variables are defined to set the width and height of the player’s car (carWidth, carHeight) and its initial position (carX, carY) near the bottom of the canvas. The car’s speed is set with carSpeed.
					let score = 0;

// Car Properties
const carWidth = 50;
const carHeight = 100;
let carX = canvas.width / 2 - carWidth / 2;
let carY = canvas.height - carHeight - 10;
let carSpeed = 5;
Other Car Properties: A list of other cars (otherCars) is initialized along with the dimensions (otherCarWidth, otherCarHeight), though their positions and movement aren’t defined here.
					// Other car properties
const otherCars = [];
const otherCarWidth = 50;
const otherCarHeight = 100;
Step 6: Handling User Input to move Car
We need a way to know if the player is pressing the left or right arrow key. Flags moveLeft and moveRight are used to track if the left or right arrow keys are pressed.
Now we need to listen to specific key events and handle them to contain logic to move the player car.
The keydown event listens for when the left or right arrow keys are pressed, setting the corresponding flags (moveLeft or moveRight) to true.
					// Key press detection
let moveLeft = false;
let moveRight = false;

// Event listeners for moving the car
document.addEventListener("keydown", (event) => {
  if (event.key === "ArrowLeft" || event.key === "a") {
    moveLeft = true;
  }
  if (event.key === "ArrowRight" || event.key === "d") {
    moveRight = true;
});
}
Similarly, set up a listener for keyup events for resetting the flags to falsewhen the keys are released.
					document.addEventListener("keyup", (event) => {
  if (event.key === "ArrowLeft" || event.key === "a") {
    moveLeft = false;
  }
  if (event.key === "ArrowRight" || event.key === "d") {
    moveRight = false;
  }
});
You have successfully set up the basic control for moving a car left and right using the keyboard. At this time we have only set conditions for when and how (direction) the car should move. We will implement the actual moving later.
Simple 2D Road Simulation
Step 7: Draw the Game Scene
Now we are going to draw our game elements on the HTML Canvas. likely representing a simple road scene with a car and other cars moving on the road.
Note: If you are not familiar with drawing on Canvas, spend few minutes to know HTML5 Canvas.
7A: Drawing the Road
The drawRoad function is responsible for drawing the road on the canvas. Let us fill the entire canvas with a dark gray color (#222), representing the road.
7B: Drawing the Divider Lanes
Now to simulate the lane divider, draw a white dashed line vertically down the middle of the road. The dashed pattern can be created by alternating 20px long lines with 15px gaps.
					function drawRoad() {
  ctx.fillStyle = "#222";
  ctx.fillRect(0, 0, canvas.width, canvas.height);

  // Draw dashed line in the middle of the road
  ctx.strokeStyle = "#fff";
  ctx.lineWidth = 4;
  ctx.setLineDash([20, 15]);
  ctx.beginPath();
  ctx.moveTo(canvas.width / 2, 0);
  ctx.lineTo(canvas.width / 2, canvas.height);
  ctx.stroke();
}
7C: Drawing the Player Car
The drawCar function draws a car (the player’s car) on the road. For now lets draw a red rectangle on the canvas. This rectangle will represent the car and its position is determined by the variables carX and carY. The width and height of the car are determined by carWidth and carHeight. We have already defined these variables above.
					function drawCar() {
  ctx.fillStyle = "red";
  ctx.fillRect(carX, carY, carWidth, carHeight);
}
7D: Drawing Other Cars
The function drawOtherCars draws other cars (likely obstacles or other vehicles on the road).
The otherCars array is expected to contain objects that represent other cars on the road. Each object should have x and y properties that define the position of the car.
The forEach method iterates over each car in the otherCars array, and a blue rectangle is drawn for each car using car.x and car.y for the position, and otherCarWidth and otherCarHeight for the size of the car.
					function drawOtherCars() {
  ctx.fillStyle = "blue";
  otherCars.forEach(car => {
    ctx.fillRect(car.x, car.y, otherCarWidth, otherCarHeight);
  });
}
Step 7 Summary:
drawRoad()creates a dark road with a dashed white line in the middle.drawCar()draws a red car based on the specified position and size.drawOtherCars()draws blue cars based on the positions provided in theotherCarsarray.
Step 8: Set up the Game Loop
Now we are going to setup the Heart of our Game i.e. The Game Loop. In essence, this game loop will set up an animation loop that keeps updating the canvas and redrawing the elements (road, cars, score).
8A: Understanding the Game Loop
Game Loop is the central part of any game’s animation cycle. Here’s what it does in this game.
- Clears the canvas to prepare for the next frame.
- Draws the road, the player’s car, and other cars on the canvas.
- Moves the game entities
- Detects collision or any other game condition
- Repeats the entire process to ensure the game runs smoothly and continuously.
8B: Implementing the Game Loop
Let us implement a game loop using JavaScript’s requestAnimationFrame() method. This function is commonly used in animations and games to continuously update and render the game state. Create a function gameLoop.
					function gameLoop() {
// Clear the canvas before each frame
  ctx.clearRect(0, 0, canvas.width, canvas.height);

  drawRoad();
  drawCar();
  drawOtherCars();

  // Continue the game loop
  requestAnimationFrame(gameLoop);
}
requestAnimationFrame(function) is a built-in JavaScript function that tells the browser to call the passed function again as soon as it’s ready to repaint the screen. This creates a smooth animation loop by synchronizing the game loop with the browser’s refresh rate (usually 60 frames per second).
By calling requestAnimationFrame(gameLoop) within itself, the game loop continues indefinitely until stopped.
Now lets call gameLoop function which will start the infinite game loop. Without this line, the gameLoop function wouldn’t run on its own.
gameLoop();
Once you trigger the game loop, it starts the continuous cycle of clearing the canvas, drawing the road, cars, and updating the game state.
ctx.clearRect(0, 0, canvas.width, canvas.height);
This line clears the entire canvas each time the game loop runs, effectively erasing everything previously drawn.
It ensures that every frame starts with a clean canvas before new elements are drawn.
The parameters specify the area to clear: the top-left corner (0, 0) and the size (canvas.width, canvas.height) which represents the whole canvas.
Step 9: Handling Car Movement
Let us create the moveCar() function which will be responsible for updating the position of the player’s car on the canvas based on user input.
carSpeed controls how fast the car moves left or right, and carX stores the car’s current horizontal position.
The function checks for certain conditions (whether the player is attempting to move the car left or right) and updates the car’s position accordingly.
					function moveCar() {
  if (moveLeft && carX > 0) {
    //move the car to left with certain speed
    carX -= carSpeed;
  }
  if (moveRight && carX < canvas.width - carWidth) {
    carX += carSpeed;
  }
}
Apart from deciding the direction of movement , this function also restricts any movement beyond boundaries of the canvas so that the car can’t leave the game screen and disappear at extreme left or right. Let us combine these two conditions.
- If the player wants to move left (
moveLeftis true) and the car is not at the left edge (carX > 0), the car moves left. - If the player wants to move right (
moveRightis true) and the car is not at the right edge (carX < canvas.width - carWidth), the car moves right.
Note: Call this function in the game loop to update the car’s position based on player inputs.
Step 10: Generating Other Cars
Let us create a function generateOtherCars. It will be responsible for randomly generating new cars on the screen.
10A: Generate Other Cars Randomly
Use the Math.random() function which generates a random number between 0 and 1. If the generated number is less than 0.02 (2% chance), a new car should be generated. This controls the frequency of car generation. If the probability meets, a new car should be created at some position (x,y).
- Variable x holds the horizontal position for the new car, ensuring that the car does not go off-screen horizontally. It uses the width of the canvas (canvas.width) minus the width of the car (otherCarWidth), ensuring the car will be fully visible.
- The y-position is set just above the top of the screen (-otherCarHeight), so the car appears from the top and starts moving downward.
- This adds the newly created car (with its x and y coordinates) to the otherCars array, which tracks all the cars on the screen.
					function generateOtherCars() {
  // With 2% chance to generate a new car
  if (Math.random() < 0.02) {
  // Random x position
    const x = Math.random() * (canvas.width - otherCarWidth);
  // Start the car just above the screen
    const y = -otherCarHeight;
    otherCars.push({ x, y });
  }
}
As we want to continously generate other cars during the game play, call this method from the game loop.
10B: Move Other Cars
Now write a function generateOtherCars() to handle the movement of the other cars and checking if they have gone off the screen.
This function loops through the otherCars array, moving each car downward by 3 pixels and making it move vertically towards the bottom of the screen.
This checks if the car’s y-position has passed the bottom of the screen (i.e., if it’s no longer visible) then the car is removed from the otherCars array, as it has gone off-screen.
					function moveOtherCars() {
  otherCars.forEach((car, index) => {
    car.y += 3;  // Speed of other cars
    if (car.y > canvas.height) {
      otherCars.splice(index, 1); // Remove car when it goes off-screen
      score += 10; // Increase score for avoiding a car
    }
  });
}
Each time a car is removed because it already completed its cycle, the player’s score is increased by 10 points. This indicate that the player successfully avoided the car (represents success in the game).
Note: Call the function moveOtherCars() in the game loop because we want the game to regularly move the other cars on the road and update the score.
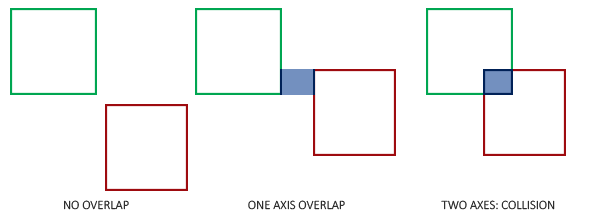
Step 11: Collision Detection
Lets move on and implement a simple collision detection. collision detection is a way to detect if a game entity collided with any other entity during the game play. Let us create a function called checkCollision that checks if the player’s car collides with any other cars in the game. If a collision is detected, the game ends, and the player’s final score is displayed.
Think in terms of Co-ordinate Geometry, we only need to determine if a given rectangle (car in our case) overlaps with another rectangle. This is called bounding box collision detection.
					function checkCollision() {
  for (let i = 0; i < otherCars.length; i++) {
    const car = otherCars[i];
    if (
      car.x < carX + carWidth &&
      car.x + otherCarWidth > carX &&
      car.y < carY + carHeight &&
      car.y + otherCarHeight > carY
    ) {
      // Game over condition if collision happens
      alert("Game Over! Final Score: " + score);
      resetGame();
    }
  }
}
Explanation of Collision Detection Logic: The following condition checks if the player’s car and the other car are overlapping (i.e., colliding).
car.x < carX + carWidth: This checks if the left edge of the other car is to the left of the right edge of the player’s car.car.x + otherCarWidth > carX: This checks if the right edge of the other car is to the right of the left edge of the player’s car.car.y < carY + carHeight: This checks if the top edge of the other car is above the bottom edge of the player’s car.car.y + otherCarHeight > carY: This checks if the bottom edge of the other car is below the top edge of the player’s car.
If all these conditions are true, it means the two cars are overlapping, which means a collision has occurred.
If any collision is detected, we will display an alert message showing the message “Game Over!” and the player’s final score.
We also need to reset the game by resetting variables, positions, and possibly reloading the game state to restart. Lets create an empty function resetGame(). We will implement it in the last step.
					function resetGame() {
}
Step 12: Updating Score
We have already implemented a basic scoring strategy for the game. Only that the score is not updating in the screen. Let us create a function updateScore that will bind the current score in the html template.
					function updateScore() {
  document.getElementById("score").innerText = "Score: " + score;
}
Call this function from within the gameLoop function.
Step 13: Implementing Game Reset
Everything is almost done. We want the resetGame function to reset the score, position of the player car and empty the other cars. This will initialize the game for a new play.
					function resetGame() {
  carX = canvas.width / 2 - carWidth / 2;
  carY = canvas.height - carHeight - 10;
  otherCars.length = 0;
  score = 0;
}
Let us review your gameLoop function. Make sure that all the continously running game activities are called from within this loop.
					function gameLoop() {
  ctx.clearRect(0, 0, canvas.width, canvas.height);

  drawRoad();
  drawCar();
  drawOtherCars();

  moveCar();
  generateOtherCars();
  moveOtherCars();
  checkCollision();
  updateScore();

  requestAnimationFrame(gameLoop); // Continue the game loop
}
That’s great! You have a working 2D Car Race Game written in JavaScript now. Feel free to enhnace the game and add it to your Portfolio.