No products in the cart.

- Learn how to access and modify DOM elements in a webpage
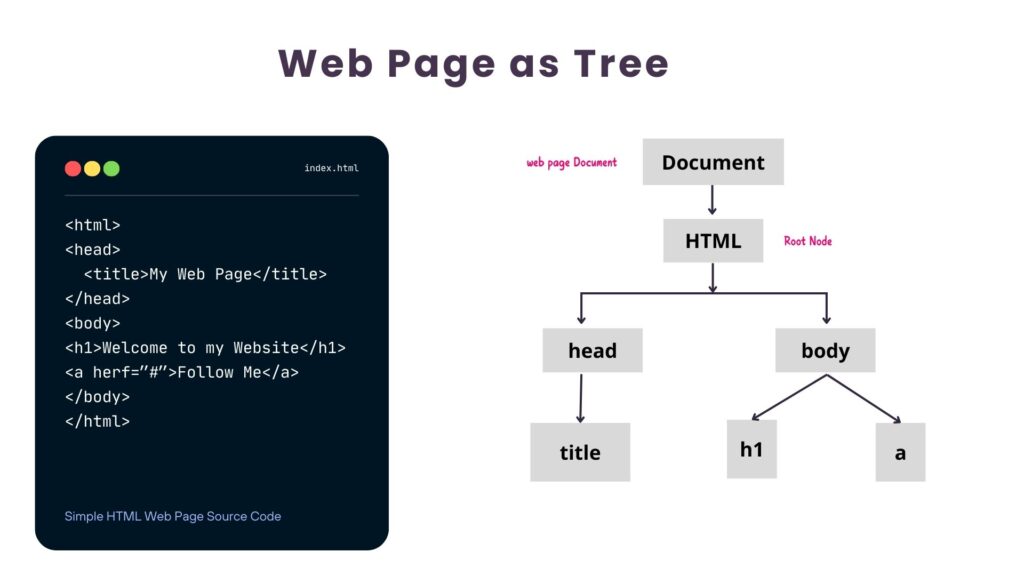
Document Object Model (DOM) represents the structure of a web page as a tree of nodes, where each node corresponds to a part of the document.
- Have a look at below image. The Left hand side is the source code of a simple web page written in HTML.
- When an HTML document is loaded into a browser window, then it becomes a document object.
- This document object stores the elements of the HTML document, such as HTML, HEAD, BODY, and other tags as nodes.
- The Right hand side displays the generated DOM structure.
The JavaScript DOM API
The Document Object Model (DOM) API in JavaScript provides a way to interact with the HTML document. Using the DOM API, we can dynamically access and modify the content, structure, and style of web pages.

In JavaScript, document is an in-built object that gives access to the currently loaded HTML document. It is a part of the window global object, which represents the window of current web page.
JavaScript document object – Mozilla Documentation
The document object provides different methods to access elements of a HTML page. Understanding how to use this document object is essential for any JavaScript Programmer. Let us see some examples of basic DOM operations.
1. Accessing DOM Elements
We can access elements in the DOM using methods like getElementById, getElementsByClassName, and querySelector.
a) getElementById is used to select an element by its id.
HTML
<div id="myDiv">Hello World!</div>Above is a HTML div element that is marked with a CSS id “myDiv”. To access this element we can use getElementById() function of the document object.
JavaScript
<script>
  const element = document.getElementById('myDiv');
  console.log(element.textContent); // Output: Hello World!
</script>
b) getElementsByClassName is used to select elements by their class name. This method returns multiple elements as an array.
<div class="myClass">Item 1</div>
<div class="myClass">Item 2</div>
<script>
  const elements = document.getElementsByClassName('myClass');
  console.log(elements[0].textContent); // Output: Item 1
</script>
c) querySelector is used to select the first element that matches a CSS selector.
<p class="special">This is a special paragraph.</p>
<script>
  const element = document.querySelector('.special');
  console.log(element.textContent); // Output: This is a special paragraph.
</script>
d) querySelectorAll selects all elements that match a CSS selector.
<div class="item">1</div>
<div class="item">2</div>
<script>
  const items = document.querySelectorAll('.item');
  items.forEach(item => console.log(item.textContent)); // Output: 1 2
</script>
2. Modifying DOM Elements
Once we have a reference to an element, we can modify its properties, attributes, and content. Let us see some examples below where we will perform DOM manipulation using JavaScript.
2.1 Change text content:
<p id="para">Old Text</p>
<script>
  const para = document.getElementById('para');
  para.textContent = 'New Text'; // Changes the text content of the paragraph
</script>
2.2 Change HTML content:
<div id="container">Original content</div>
<script>
  const container = document.getElementById('container');
  container.innerHTML = '<strong>Updated content</strong>'; // Replaces HTML content
</script>
2.3 Change attributes:
<img id="myImage" src="oldImage.jpg" alt="Old Image">
<script>
  const img = document.getElementById('myImage');
  img.setAttribute('src', 'newImage.jpg'); // Changes the src attribute of the image
</script>
2.4 Add or remove classes:
<div id="myDiv">Hello!</div>
<script>
  const div = document.getElementById('myDiv');
  div.classList.add('highlight'); // Adds a class
  div.classList.remove('highlight'); // Removes a class
</script>
3. Creating and Inserting DOM Elements
We can create new elements and insert them into the web page. Let us see some examples of adding list items to an unordered list.
3.1 Create and append an element:
<ul id="myList"></ul>
<script>
  const ul = document.getElementById('myList');
  const li = document.createElement('li');
  li.textContent = 'New List Item';
  ul.appendChild(li); // Adds the new <li> to the <ul>
</script>
3.2 Insert before an element:
<ul id="myList">
  <li>Item 1</li>
  <li>Item 2</li>
</ul>
<script>
  const ul = document.getElementById('myList');
  const newLi = document.createElement('li');
  newLi.textContent = 'Inserted Item';
  ul.insertBefore(newLi, ul.firstChild); // Inserts the new item at the beginning
</script>
4. Removing Elements
We can also remove elements from the DOM.
Remove an element:
<div id="toRemove">Remove me!</div>
<script>
  const element = document.getElementById('toRemove');
  element.parentNode.removeChild(element); // Removes the element from the DOM
</script>
5. Handling Events
The DOM API also enables us to attach and handle events like clicks, form submissions, etc. on HTML elements. Let us see a simple example where JavaScript can access a button and add an event listener for click events.
Add an event listener:
<button id="myButton">Click Me!</button>
<script>
  const button = document.getElementById('myButton');
  button.addEventListener('click', () => {
    alert('Button clicked!');
  });
</script>
This is just a simple example. JavaScript identifies a wide range of Events and provides us ways to handle them. We will learn about Event Handling in Details in the next lesson.
Summary
The DOM API is essential for creating dynamic, interactive web applications. It allows us to access, modify, and manipulate the content and structure of web pages in real-time. By understanding and using the DOM methods and properties, we can build more interactive and engaging user interfaces.