No products in the cart.
Local repository (repo) means the repo which is on our system whereas, a remote repo. means the one which is on other remote system/server, for eg. GitHub, GitLab, Bitbucket, etc. In this leesson we will learn how to create a remote repository using GitHub and working in collaboration with a team.
Getting Started
Create a GitHub Repository
Creating a Github repo is straightforward. Please follow this official Github documentation on creating a remote repository
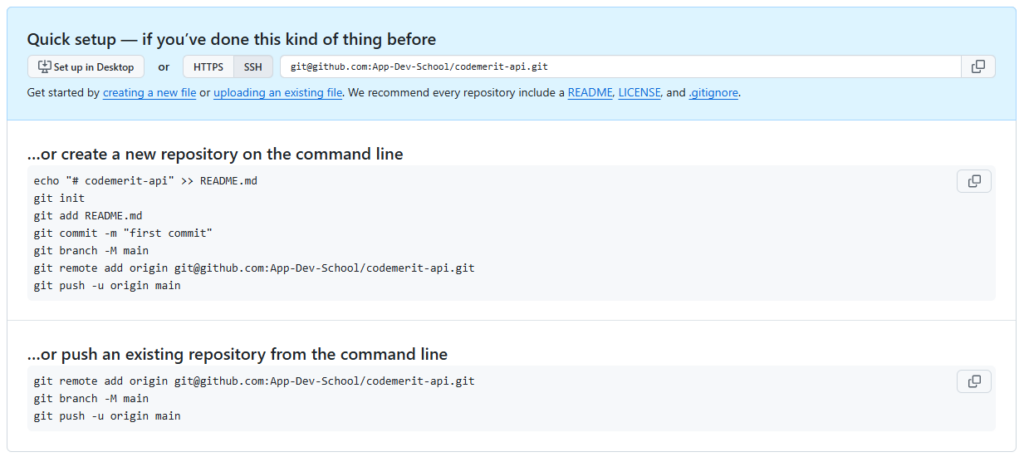
This is What Github displays after creating a Repo
Push local repo to GitHub
Copy the url or the link of the repo that we just created. For e.g. it should look like: https://github.com/example
/example.git
Paste the copied url in the below git command
$ git remote add origin
‘git remote add origin ’ specifies that we are adding a remote repository, with the specified URL, as an origin to our local Git repo.
Finally, pushing our master branch to the origin URL (remote repo) and set it as the default remote branch.
$ git push --set-upstream origin master
Go back into GitHub and see that the repository has been updated.
Pushing local repo to github after doing the above process at least once
First commit all the changes. Then push all the changes to our
remote origin i.e. remote repo on github.
$ git push origin
Pull local repo from GitHub
Git pull is used to pull all changes from a remote repository into the
branch we are working on. It is a combination of fetch and merge. Use it
to update your local Git.
$ git pull origin
Pull branch from GitHub
We should check that which branches are available for the repoitory. And where we working at the moment by ‘git branch’ command.
Since we do not have the new branch on out local Git which is to be pulled from the Github. So, to see all local and remote branches, use –
					git branch
//outputs the current branch
*main
For viewing only remote branches
$ git branch -r
Now, the new branch is seen in the console but it is not available on our local repo. So, let’s check it out using ‘git checkout ’. Now run ‘git pull’ to pull that branch on our local repo. We can now check the available branches using ‘git branch’.
Push branch to GitHub
First, let’s create a new local branch which we will be pushing to Github. Enter the command as ‘git checkout -b ’. You can check the status of the files in this current branch using ‘git status’. Commit all the uncommitted changes for all the files in this branch using ‘git commit -a -m “” ’. Now push this branch from our local repo to Github using ‘git push origin ’
Git clone from GitHub
We can clone a forked repo from Github on our local repo. A clone is
a full copy of a repository, including all logging and versions of files. Move
back to the original repository, and click the green “Code” button to get
the URL to clone. Copy the URL.
Now in the git bash, enter the following command to clone the
copied repo onto your local machine –
$ git clone
To specify a specific folder to clone to, add the name of the folder
after the repository URL, like this –
$ git clone